Learn This! How To Braid Like A Pro (Step-by-Step)
Intrigued by the allure of intricate hairstyles, or perhaps yearning for a fresh, manageable look? The art of braiding, far from being a relic of the past, is a dynamic skill that empowers individuals to express their creativity and embrace their unique style. It's a skill that transcends age, culture, and hair type, offering endless possibilities for self-expression and a touch of everyday elegance.
Braiding, in its essence, is the interlacing of three or more strands of a flexible material, most commonly hair, to create a patterned design. But beyond the technical aspects, it is a craft that has evolved through generations, representing everything from cultural identity to personal artistry. It is a versatile skill, adaptable to everything from practical styling to high-fashion statements. Mastering the basics opens doors to a world of elaborate styles, showcasing an ability that is both functional and profoundly creative.
Here's a step-by-step breakdown of how to begin, starting with the classic three-strand braid, the bedrock of many other styles:
Preparation is Key: Before you begin, ensure the hair is clean and detangled. Use a wide-tooth comb to eliminate knots, working from the ends up to the roots. This prevents breakage and ensures a smoother braid. You might also want to dampen the hair slightly, especially if its thick or prone to frizz. This can help with control and manageability. Consider using a leave-in conditioner or a styling product to add shine and hold. Gather your supplies: a comb, a hair tie, and perhaps some clips to keep sections tidy.
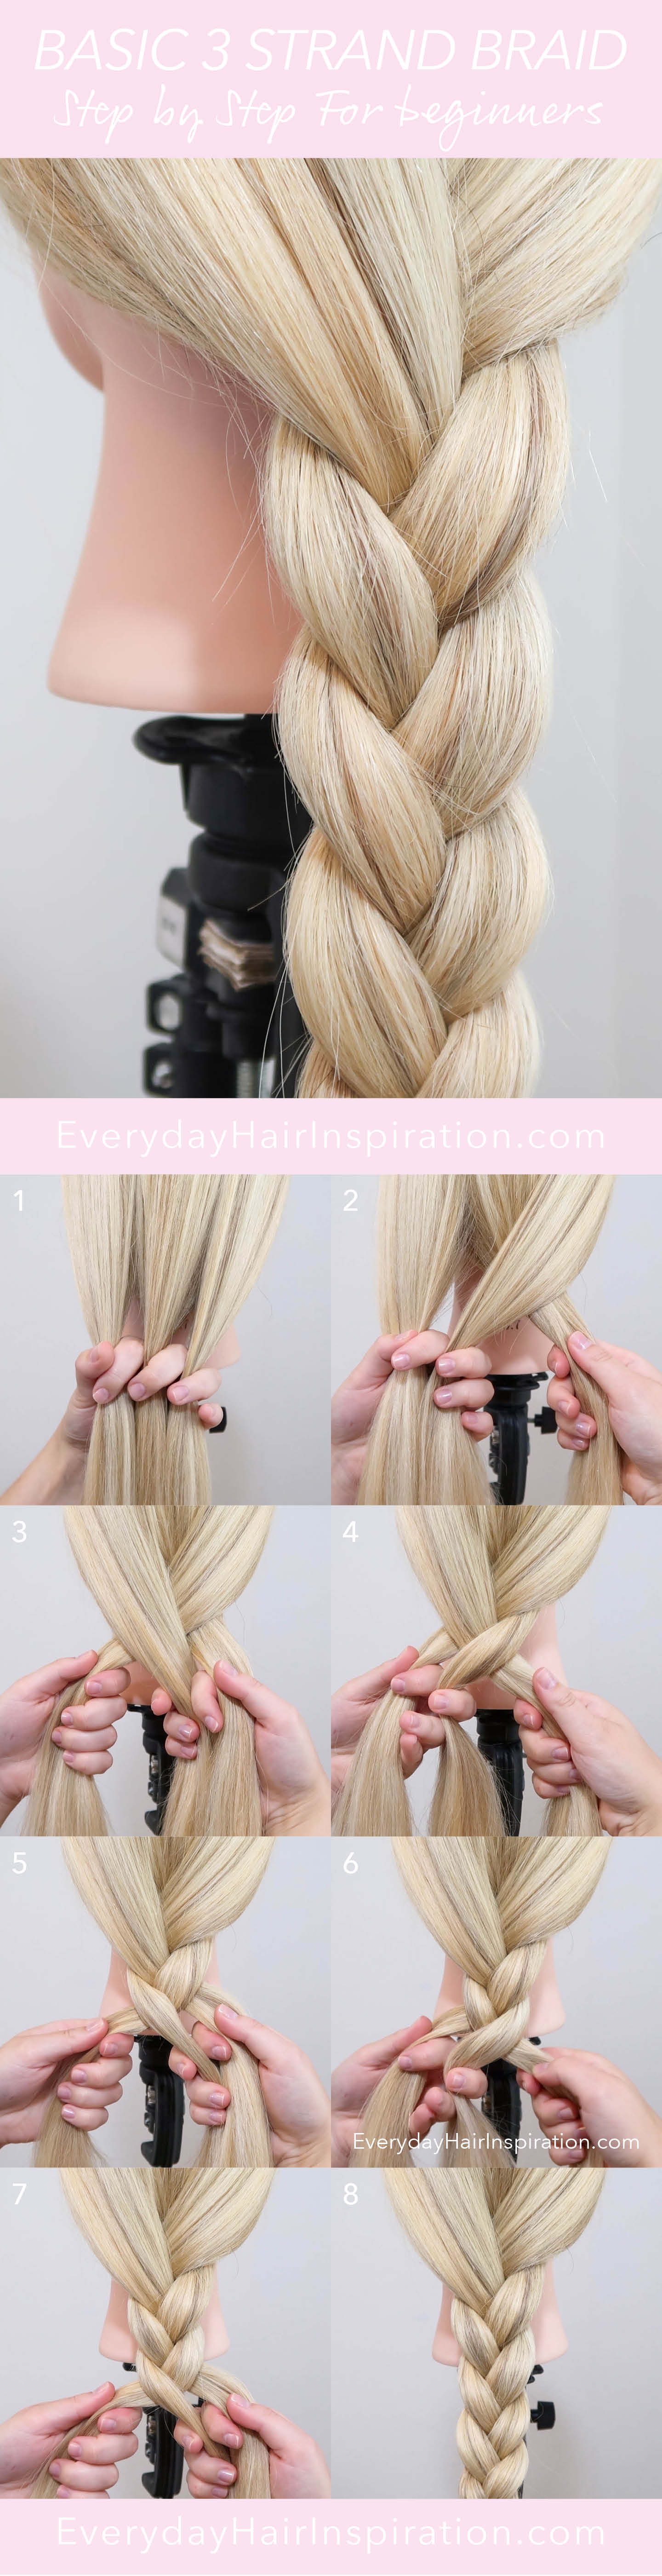
The Three-Strand Braid:
- Sectioning: Divide the hair into three equal sections. This is the foundation. Make sure the sections are relatively uniform in size for a balanced look.
- Crossing the Strands: Take the right section and cross it over the middle section. Now, the right section becomes the new middle section.
- Repeating the Process: Take the left section and cross it over the new middle section (which was originally the right section). The left section is now the new middle section.
- Continuing the Pattern: Repeat steps 2 and 3, alternating sides, maintaining tension throughout the braid. Ensure each strand is crossed over the middle section, creating the interwoven pattern.
- Securing the Braid: Once you reach the end of the hair, secure the braid with a hair tie.
Tips for Success:
- Practice Makes Perfect: Don't be discouraged if your first attempts aren't flawless. Braiding takes practice.
- Tension is Important: Maintain consistent tension to prevent the braid from becoming loose or uneven.
- Experiment with Products: Try different products, such as mousse, gel, or serums, to find what works best for your hair type and desired look.
- Start Simple: Begin with basic braids before attempting more complex styles.
- Mirror, Mirror: Practice in front of a mirror to see what you're doing and make adjustments.
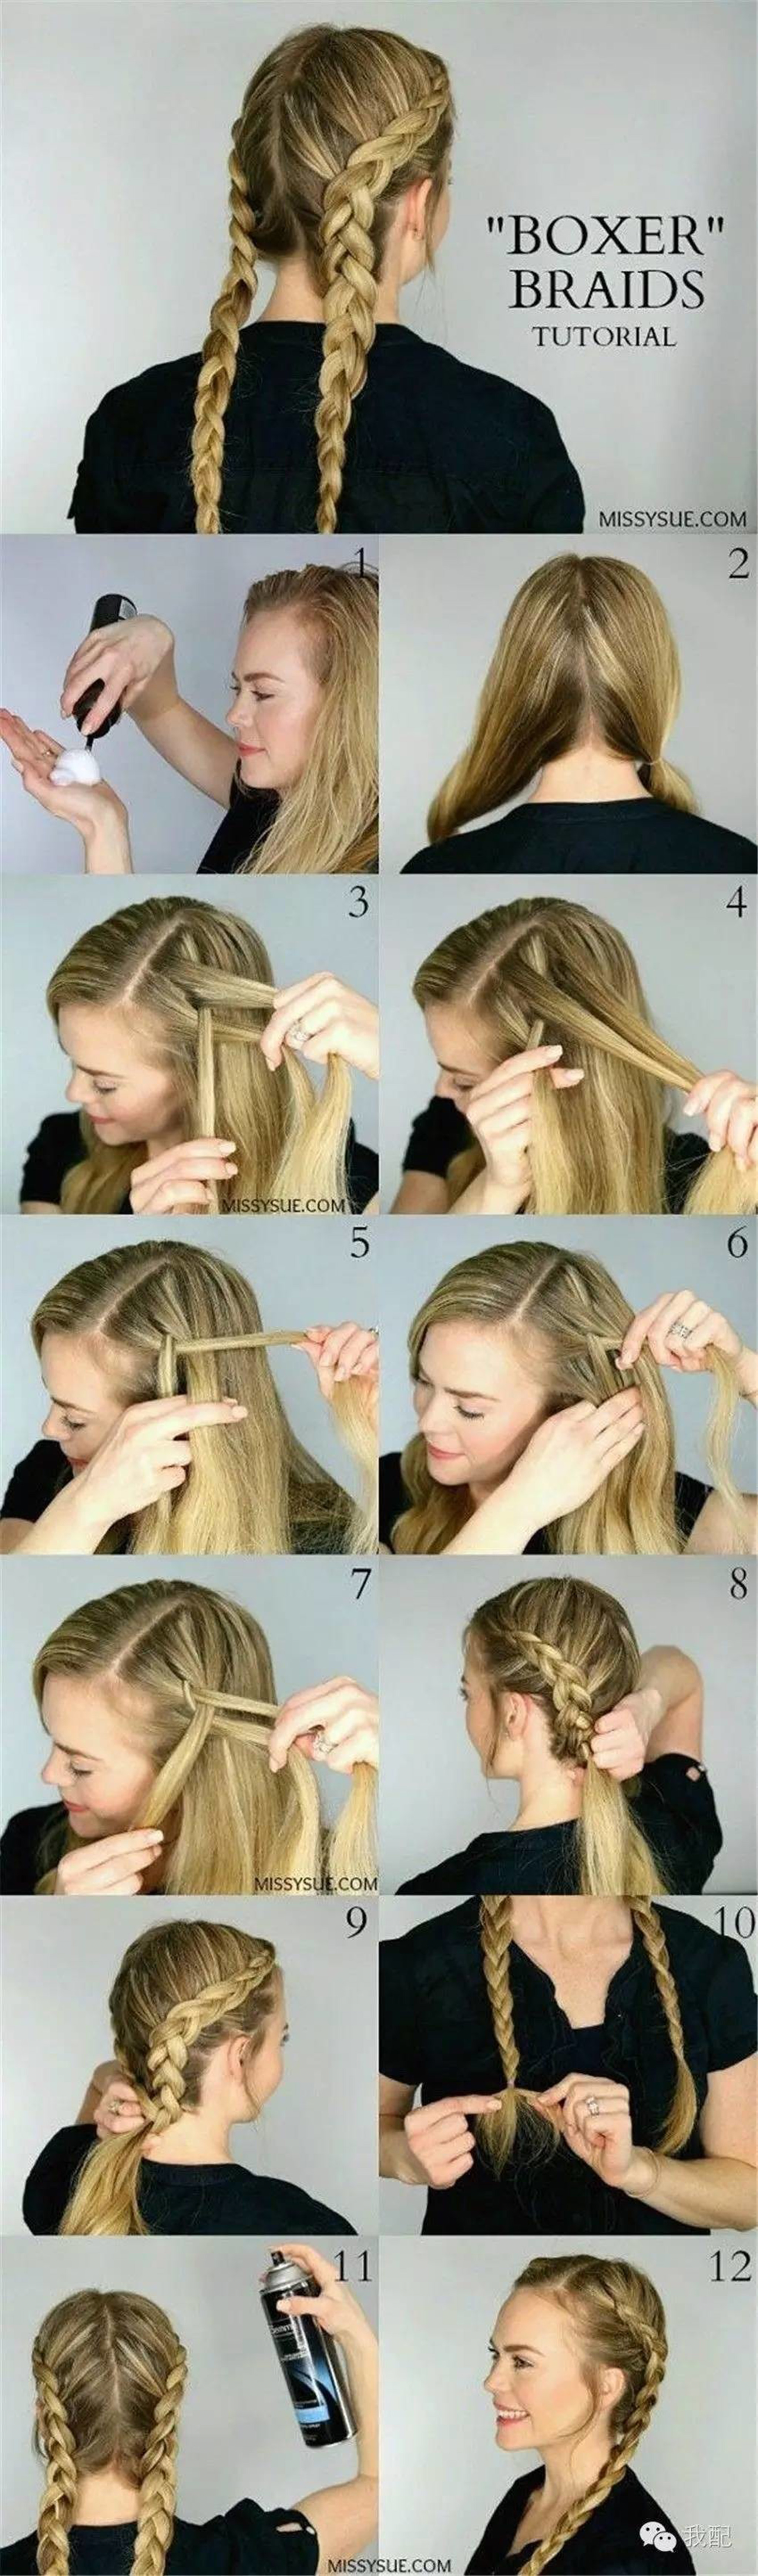
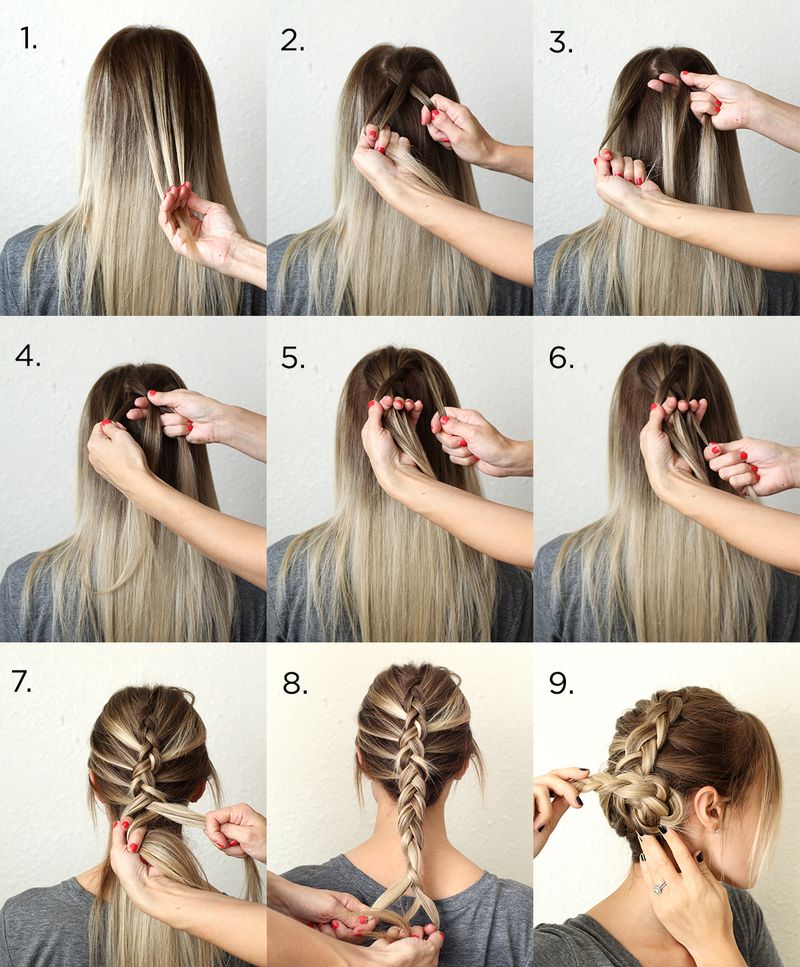
From this basic structure, numerous variations emerge, each presenting unique aesthetic opportunities. The French braid, for instance, incorporates hair from the sides of the head as the braiding progresses, creating a braid that sits snugly against the scalp. The Dutch braid, similar in technique, creates a braid that appears to sit on top of the hair, as the sections are crossed under instead of over. These are just a few examples demonstrating the endless creative opportunities.
French Braid
- Sectioning: Start by sectioning off a small portion of hair at the crown of the head. Divide this into three equal strands, as with the standard braid.
- Beginning the Braid: Begin braiding these three strands, just like a regular three-strand braid, crossing the right strand over the middle, then the left strand over the new middle.
- Adding Hair: As you braid, incorporate small sections of hair from the sides of the head into the respective outer strands. For instance, before crossing the right strand over the middle, add a small section of hair from the right side to the right strand.
- Continuing the Process: Continue braiding, adding hair to the outer strands with each cross, working your way down the head.
- Securing the Braid: When you reach the nape of the neck and have incorporated all the hair, finish the braid as a regular three-strand braid and secure it with a hair tie.
Dutch Braid
- Sectioning: Section off a portion of hair at the crown and divide it into three equal strands.
- Beginning the Braid: Cross the right strand under the middle strand, then the left strand under the new middle strand. This is the key difference from a French braid.
- Adding Hair: As you braid, incorporate sections of hair from the sides, just like with the French braid. Before crossing the right strand under the middle, add a section from the right side.
- Continuing the Process: Continue braiding, adding hair and crossing the strands under, to create a braid that sits atop the hair.
- Securing the Braid: Finish the braid as a regular three-strand braid once you have incorporated all the hair, and secure it with a hair tie.
The fishtail braid, a more intricate look, involves dividing the hair into two sections instead of three. Strands from the outer edges of these sections are then crossed over to the opposite side, creating a pattern that resembles fish scales. This technique, while more complex, highlights the versatility of the basic braid.
Fishtail Braid
- Sectioning: Divide the hair into two equal sections.
- Taking a Strand: Take a small section of hair from the outside of the right section.
- Crossing Over: Cross that small section over to the left section, adding it to the left side.
- Taking Another Strand: Now, take a small section of hair from the outside of the left section.
- Crossing Over: Cross this section over to the right section.
- Repeating: Repeat steps 2-5, taking small sections from the outside of each section and crossing them over to the opposite side.
- Finishing: Continue until you reach the end of the hair, and secure with a hair tie.
Beyond the basic braids, the world of braiding expands to encompass a vast array of styles, each drawing on unique cultural traditions and contemporary trends. Cornrows, originating in Africa, involve braiding the hair close to the scalp in rows, providing a protective style and serving as a canvas for intricate designs. Box braids, another popular protective style, involve sectioning the hair into squares or boxes and braiding each section. These styles are often adorned with beads, cuffs, and other accessories, showcasing a range of aesthetics and celebrating diverse cultural expressions.
Caring for Braided Styles: Maintaining the longevity and health of your braids is crucial. Protective styles, like cornrows and box braids, often require specific care. Regular moisturizing of the scalp is crucial to prevent dryness and itching. This can be achieved by applying oils or moisturizing sprays to the scalp and hair. Washing your braids regularly, but not too frequently, is necessary to remove build-up and keep your hair clean. A good wash and conditioning routine will contribute to the health of your braids. Protective styles, like cornrows and box braids, require a degree of caution to prevent potential problems. The braids should not be pulled too tightly, as this can lead to hair loss or scalp irritation. Ensuring the braids are installed by a professional stylist is important to minimize these risks.
Braiding isn't merely about aesthetics; it also plays a significant role in protecting natural hair. Protective styles help to reduce breakage and retain length, which are particularly important for those with textured hair. Cornrows, box braids, and other braided styles keep the ends of the hair tucked away, shielding them from environmental factors and reducing manipulation, both of which can contribute to hair damage. Choosing the appropriate style and implementing effective maintenance techniques are critical for achieving the desired outcome without compromising the health of your hair.
Tools of the Trade: Braiding is often made simpler by a few essential tools. A good comb, such as a wide-tooth comb for detangling and a rat-tail comb for sectioning, is indispensable. Hair ties, bobby pins, and clips are used for securing braids and holding sections of hair in place. For those seeking to create more elaborate styles, additional tools, such as braiding aids, hair accessories (beads, cuffs, ribbons), and specialized styling products, might be needed. Choosing the right tools can significantly affect the ease and outcome of the braiding process.
Braiding styles have become an essential part of fashion. Braids are adaptable to a wide variety of occasions and personal preferences. Braids, from the most basic to the most intricate, are very popular. Braiding styles have been seen on fashion runways and have been embraced by celebrities and influencers. Braids make a powerful statement about the importance of individual expression and cultural significance. The wide range of braiding methods has created a dynamic and constantly changing landscape that is changing the nature of beauty and style. The braid continues to evolve with current trends and individual expression.
Beyond the Basics: Once you master the basic braid techniques, the possibilities are endless. Experiment with different partings, add accessories like beads or ribbons, and combine different braid styles to create unique looks. Try combining different types of braids in the same hairstyle, like adding a fishtail braid to a French braid or incorporating cornrows into an updo. Watch tutorials online and practice often. Do not be afraid to experiment, the key is to play with different techniques until you find styles that work. The ultimate goal is to develop a hairstyle that expresses your individual style.
Braiding, therefore, is more than just a hairstyle. It's a skill, an art form, a form of self-expression, and a means of connecting with traditions across cultures. As you embark on this journey of discovery, remember that patience and practice are your greatest allies. Embrace the learning process, celebrate your successes, and most importantly, enjoy the creativity and satisfaction that comes with transforming strands of hair into works of art.