Easy Guide: How To Draw A Shark Step-by-Step!
Ever considered the ocean's apex predator, a creature of myth and marine dominance? The ability to capture the essence of a shark on paper is not merely a skill; it's a journey into the heart of artistic expression and a fascinating exploration of form, movement, and the untamed beauty of nature. We are not just replicating a shape; we're breathing life into an image, conveying the power, grace, and inherent danger of this magnificent animal. This guide aims to unlock the secrets to drawing a shark, step-by-step, transforming your blank canvas into a captivating portrayal of this iconic denizen of the deep.
The allure of sharks has captivated humankind for centuries. Their sleek bodies, razor-sharp teeth, and silent presence have inspired both fear and admiration. From the smallest dwarf lanternshark to the colossal whale shark, the diversity within the shark family is breathtaking. Drawing a shark allows you to connect with this captivating creature on a deeper level, understanding its anatomy, appreciating its form, and acknowledging its place in the intricate web of marine life. This is not just about replicating an image; it's about understanding. It's about seeing. It's about creating.
Let's embark on a journey into the art of drawing a shark. Before we begin, gather your supplies. You'll need a pencil (a range of hardnesses is useful, such as HB for general sketching and 2B or 4B for shading), an eraser (kneaded erasers are excellent for lifting graphite), drawing paper (smooth or medium surface), and a sharpener. Optional tools include blending stumps or tortillons for smoothing out shading, and a ruler for creating precise guidelines.
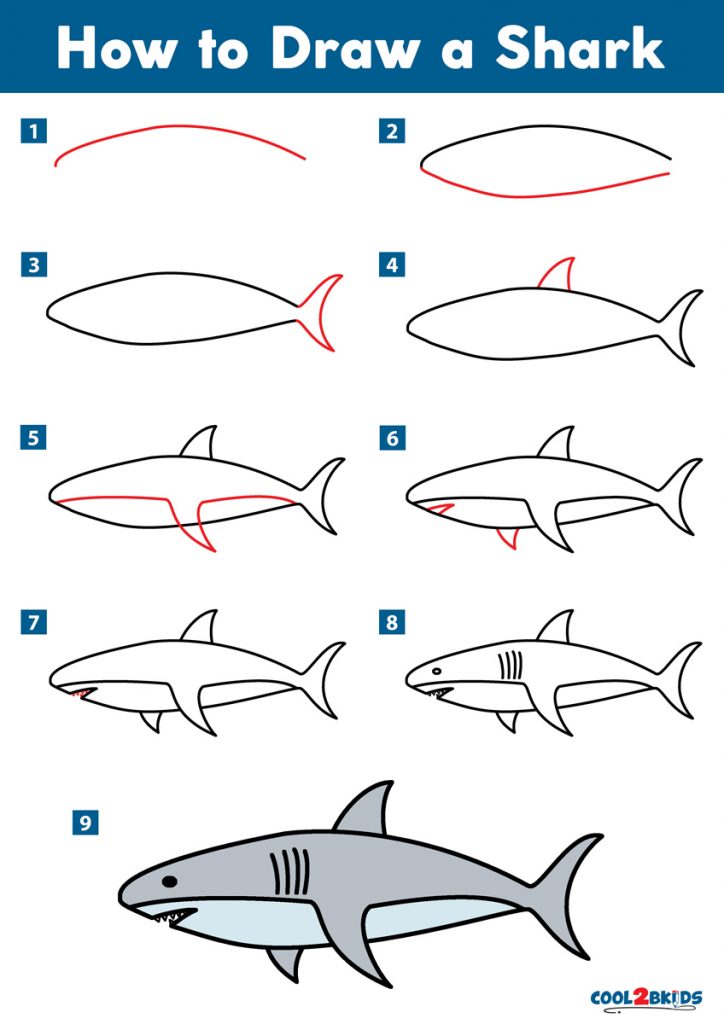
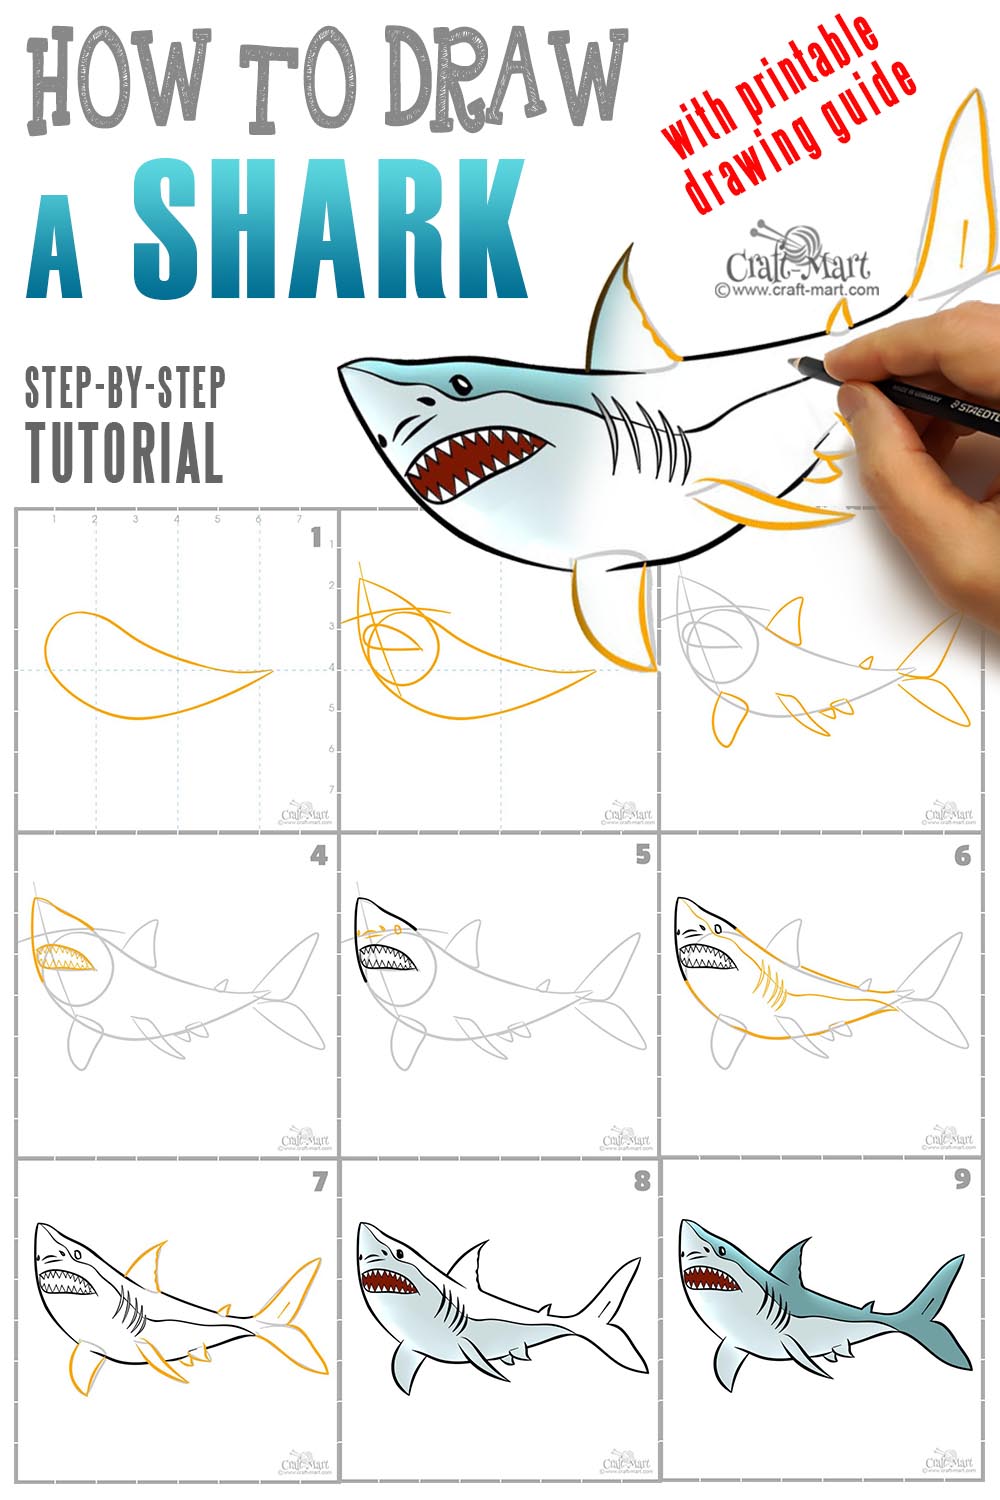
The first step in any drawing, including a shark, is understanding the basic form. A shark's body can be simplified into a series of geometric shapes. Start by sketching a slightly elongated oval for the body. This represents the main bulk of the shark. Next, add a triangular shape for the head, connecting it smoothly to the oval. Then, sketch a smaller triangle for the dorsal fin on the sharks back and a crescent shape for the caudal fin (tail). Finally, add pectoral fins (the ones on the sides) as somewhat elongated, slightly curved triangles. This initial skeletal framework will serve as your foundation.
Once you have your basic shapes, refine the outline. Gently round the edges of the body, softening the geometric forms. Pay attention to the shark's natural curves, especially around the belly and the area where the head meets the body. Refine the shape of the fins, giving them their characteristic contours. Remember that different shark species have different body shapes and fin configurations. Consider what kind of shark you're aiming to depict (e.g., a great white, a hammerhead, a tiger shark) and adjust the shape accordingly.
The next step involves adding detail. Begin by sketching the gills, which are usually located behind the head and along the sides of the body. Add a small, dark eye. Draw the mouth, remembering that shark mouths often have a slight curve and a hint of an underbite. Detail the fins, showing the subtle curves and textures of the fin membranes. Now, lightly sketch the teeth. These are typically triangular and arranged in rows. Observe the shark's overall anatomy; how does the shark's body flow? Is there an angle of attack or a sense of movement?
Shading is a crucial element that brings your shark drawing to life. Consider where your light source is coming from. Is the light coming from above, from the side, or from below? Decide where the highlights will be and where the shadows will fall. Use varying degrees of pressure with your pencil to create different shades. Start by lightly shading the entire shark to establish the base tone. Then, gradually build up the shadows by adding more layers of graphite. Use a blending stump or tortillon to smooth out the shading and create soft transitions between light and dark areas. Pay close attention to the areas where the light hits the shark and the areas where the shadows are deepest. For instance, the underside of the shark, the space beneath the fins, and the shaded side of the body will be darker.
Once you're happy with the shading, add the finishing touches. This might include adding details like texture to the skin, or the subtle sheen of the water reflecting on the shark's body. You can also add environmental details such as bubbles, coral reefs, or other marine life to create a more dynamic composition. Step back from your drawing and assess it. Does it capture the essence of a shark? Does it convey the power, grace, and mystery of this magnificent creature? This is a journey, and each shark you draw will be a step forward in your skills.
There are many different shark species, each with its unique characteristics. Let's look at a few common types and their specific features. For the Great White Shark, known for its powerful build, you might emphasize the robust body shape, the triangular teeth, and the dark gray coloration. For the Hammerhead Shark, the unusual head shape is the defining feature. Concentrate on the broad, hammer-shaped head, the eyes positioned on the tips of the "hammer," and the sleek body. With the Tiger Shark, you can focus on the vertical stripes along its body, the blunt snout, and the powerful tail.
Consider the environment. A drawing of a shark in its natural habitat is far more compelling. Start by considering the background elements. Are you depicting the shark in the open ocean, a coral reef, or a sandy seabed? Sketch the basic shapes of these elements, such as the waves, the coral, or the sand. Then, add details, such as the individual coral polyps, the texture of the sand, or the light reflecting off the water. Add other marine life to create depth. The shark may have other fish, or a school of fish swirling around it. The ocean is a vibrant place.
Different pencil grades offer a range of tonal values and effects. An HB pencil is ideal for initial sketching and outlining. It provides a medium level of darkness and is easily erasable. A 2B or 4B pencil is excellent for shading and creating darker tones. The softer graphite allows for richer shadows. A 6B or 8B pencil can be used for very dark areas, such as the shark's eye or the deepest shadows. Experiment with different pencil grades to find the ones that best suit your drawing style.
When drawing a shark's teeth, its vital to balance accuracy with artistic interpretation. Observe the arrangement of the teeth, typically in rows and often slightly overlapping. Lightly sketch the basic shape of each tooth, focusing on the triangular form and the sharp edges. As you add details, vary the sizes and shapes of the teeth to create a more realistic appearance. Consider the angle of the mouth and how the teeth are positioned within it. Some shark species have saw-like teeth designed for slicing, while others have teeth for grasping. This is another element of individuality. This is what you can really show in your drawing.
Practice and patience are crucial in improving your shark-drawing skills. The more you practice, the better you'll become at understanding the shark's anatomy, capturing its form, and mastering shading techniques. Don't be discouraged if your first attempts don't look perfect. Every drawing is a learning opportunity. Keep experimenting with different techniques, and don't be afraid to try new things. Regularly reference photographic and video material of sharks to study their anatomy and movement. Consider taking a class or workshop. The more you draw, the better you will become.
Remember to maintain good proportions. Start with the basic shapes to accurately portray the shark's body, head, and fins. Compare the size of different parts of the shark to each other. For example, how long is the body compared to the head, and how large are the fins compared to the body? Use guidelines to help you maintain these proportions. The initial framework is incredibly important for getting the proportions right from the beginning. This saves time in the long run and adds to the realism of your drawing.
Experiment with different drawing styles. A realistic style aims to create a detailed and accurate representation of the shark. A more stylized approach might involve exaggerating certain features, such as the size of the teeth or the shape of the fins. You can also explore different mediums, such as charcoal, watercolor, or digital art. The possibilities are endless. Don't be afraid to break the rules and develop your own unique artistic voice. Your artwork is about your perception of the shark.
There is no single perfect way to draw a shark. The key is to understand the fundamental principles of drawing form, proportion, shading and to apply them creatively. Each shark drawing is an opportunity to learn, experiment, and express your artistic vision. Enjoy the process of learning and creating. Enjoy connecting with this fantastic creature.
Beyond the basic steps, the most effective way to learn is to study the works of other artists. Observe how they portray sharks. Analyze their use of line, shading, and composition. Note how they capture the shark's movement and personality. Pay attention to the details that make their drawings so compelling. Search online galleries, books, and magazines for shark drawings that inspire you. Dont be afraid to try to emulate the style of another artist. It can accelerate the learning process.
Consider the role of light and shadow. Light and shadow are essential for creating depth and dimension in your drawing. Think about where the light is coming from and how it will interact with the shark's body. Use shading to show the curve of the body, the shape of the fins, and the texture of the skin. Experiment with different shading techniques, such as hatching, cross-hatching, and blending. Light can also be used to create a sense of drama and movement.
To truly excel, study shark anatomy. Examine the skeletal structure, the muscle groups, and the arrangement of the fins. Understanding how the shark's body is constructed will help you draw it more accurately and convincingly. There are many online resources available, including anatomical diagrams, illustrations, and videos. Knowing how the shark is built will provide an invaluable foundation for your artwork. You will get a much more profound level of understanding.
Consider the composition of your drawing. Composition refers to how the elements of your drawing are arranged on the page. A well-composed drawing is balanced and visually interesting. Use the rule of thirds to create a balanced composition. Divide your page into thirds both horizontally and vertically, and place the shark's focal point at one of the intersections. Consider the negative space around the shark. How does it interact with the background? The way you create the composition of your drawing can set the stage for the overall impact of your work.
When drawing, it is critical to use your resources. The more you familiarize yourself with the subject matter, the better your drawings will become. Watch documentaries, research on the Internet, and look at images of sharks in museums or aquariums. Each time you view a shark, think of how to translate what you're seeing onto paper. By the time you begin, you should have developed a more profound connection with the subject.
The ultimate aim is to create a piece of art that you are proud of. Let your passion and creativity shine through. Let your imagination guide you. Have fun. The learning never stops. You'll find satisfaction in making the beauty of the shark known to others.


