How To Draw Stitch: Easy Steps For Kids & Beginners!
Can anyone truly resist the charm of a character as endearing as Stitch? With a few simple tools and a dash of patience, anyone can learn how to capture the essence of this lovable extraterrestrial, bringing the magic of Disney to life on paper.
This article is designed to be your comprehensive guide to drawing Stitch, the iconic blue alien from Disney's Lilo & Stitch. Whether you're a seasoned artist or a complete beginner, the step-by-step instructions and helpful tips will make the process enjoyable and accessible. Gather your supplies, settle in, and prepare to embark on an artistic adventure that celebrates creativity and the enduring appeal of a beloved character.
| Attribute | Details |
|---|---|
| Character Name | Stitch (Experiment 626) |
| First Appearance | Lilo & Stitch (2002) |
| Species | Genetic Experiment (Alien) |
| Abilities | Super strength, high intelligence, ability to cling to surfaces, retractable claws, enhanced senses, energy-absorbing capabilities, and a prehensile tongue. |
| Personality | Initially destructive and rebellious, evolves into a loyal, loving, and playful companion. |
| Key Relationships | Lilo Pelekai (best friend/Ohana), Nani Pelekai (Lilo's sister), Jumba Jookiba (creator), Pleakley (associate). |
| Defining Traits | Blue fur, large ears, four arms (can retract), expressive eyes, a mischievous grin. |
| Origin | Created by Dr. Jumba Jookiba as a weapon, escapes to Earth and finds Ohana. |
| Notable Quotes | "This is my family. I found it all on my own. It's little, and broken, but still good. Yeah, still good." and "Aloha!" |
| Film Series | Lilo & Stitch (2002), Stitch! The Movie (2003), Lilo & Stitch 2: Stitch Has a Glitch (2005), and Leroy & Stitch (2006). Also featured in a TV Series, various shorts, and spin-offs. |
| Reference | Disney Wiki - Stitch |
The first thing youll need is a few simple tools. You will need paper, a pencil, and some coloring supplies to follow along. Thats it! There is no need for complex equipment to begin. This art project welcomes anyone with a willingness to learn. We will follow easy, step-by-step instructions to help you draw cute Stitch from Disney's Lilo and Stitch. This is a drawing lesson designed for all ages and skill levels. Regardless of your past art experience, this guide will make the drawing process accessible.
The goal here is simple: to draw Stitch. Today, we're learning how to draw Stitch from Lilo & Stitch! We hope you follow along with us. Join our monthly art sessions for more fun lessons. To create your own Stitch drawing, you can utilize basic shapes and colors. Follow the simple instructions and video tutorial to create your own Stitch drawing with basic shapes and colors.
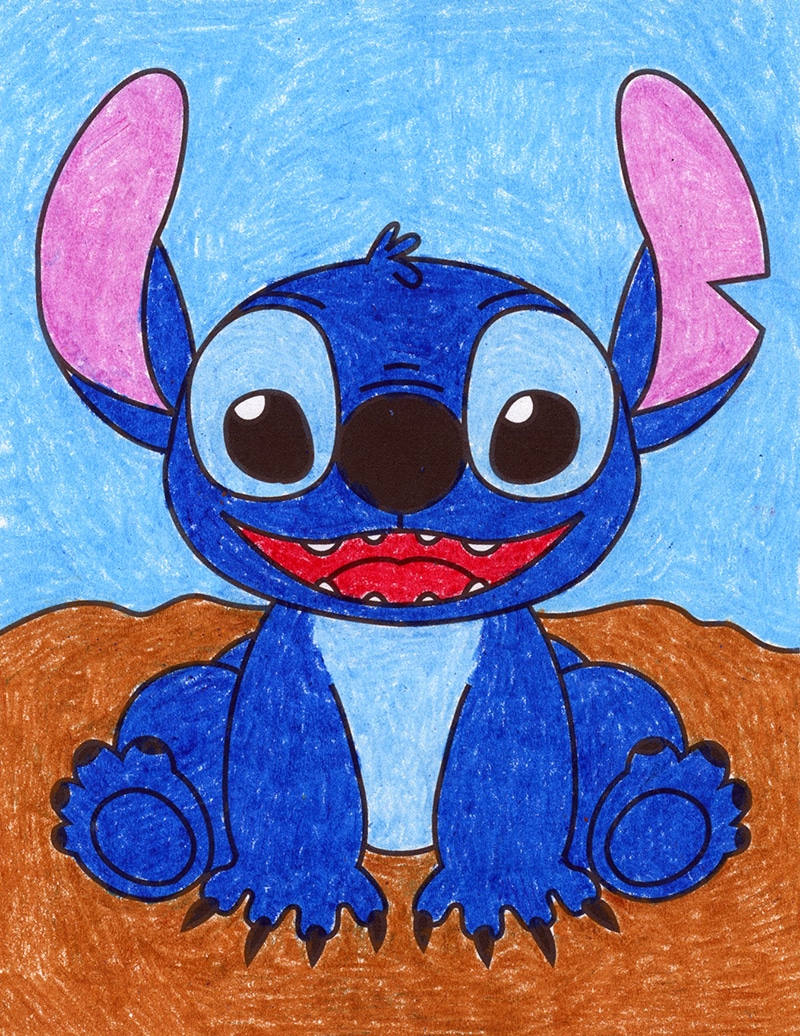
To begin, consider the basic forms that make up Stitch's face. Start with two large circles, the upper one overlapping the lower one. Draw a large circle for the nose. Then, using curved lines to indicate the nostrils. For the eyes, draw three successively smaller, irregular rounded shapes, one within the other. There is quite a bit of detail to add in here: Draw half or full ovals for the eyes. Add some scars for Stitch, who has some chipped or scarred portions on his ear. Draw in the mouth line, along with teeth. Add in the little tuft of fur sticking up at the top of Stitch's head.
Drawing the rambunctious alien from Lilo & Stitch is as easy as 1, 2, 3! Or, maybe as easy as 626. Yes, learning to draw Stitch is a breeze with an expert tutorial from the talented artists. You can take a break from those royal art works and try your hand at a neat drawing of Stitch, the lovable alien from Disney's Lilo and Stitch. This is a step-by-step drawing with easy instructions to make the job simpler. Also included is a printable version of this stitch drawing tutorial. Ideal for art teachers and homeschoolers looking to teach kids how to draw their own version of Lilo's blue pal!
Let's delve into the specifics. First, draw an oval for the head. Add the large touching face shapes. Fill in the eyes, mouth, and wrinkles. Add hair squiggle and start the ears. Add the guides for Stitch's ears by first drawing two vertical lines on top of the head. Pay attention to the length of these lines in relation to the circle. On the left side, draw a long line that curves out and down and meets the circle at the bottom. Add a similar curved line on the right side to complete the guides for the ears. Then, finish the ears and start the arms. Add fingers and nails on each. Draw the two bottoms of the feet. Add the knees and erase the gray lines. Trace with a marker and color.
Here is a step-by-step guide to make the process simpler:
- Step 1: The Foundation Start with two circles, the upper one slightly bigger, overlapping each other.
- Step 2: Guiding Lines Mark a vertical line for the nose and a horizontal line through the center of the bigger circle.
- Step 3: Face Shapes Draw an oval for the head. Add the large touching face shapes.
- Step 4: Details Fill in the eyes, mouth, and wrinkles. Add the hair squiggle and start the ears.
- Step 5: Ear Guides Add the guides for Stitch's ears, starting with two vertical lines on top of the head.
- Step 6: Ear Outlines Connect the vertical lines with curved lines to define the ears.
- Step 7: Arms and Feet Start the arms and draw the two bottoms of the feet.
- Step 8: Finishing Touches Add fingers, nails, and the knees, then erase the guide lines.
- Step 9: Defining and Coloring Trace the drawing with a marker and color it.
When drawing the lines, bend them slightly so that they contour to the shape of the sphere. For Stitch's nose, draw a circle that sits on top of the horizontal construction line. For Stitch's eyes, draw two ovals above the horizontal line, one on each side of the nose. Draw the oval on the left a bit thinner because of the
For the eyes, draw three successively smaller, irregular rounded shapes, one within the other. Add more small details for the Stitch. Add some scars for Stitch, who has some chipped or scarred portions on his ear. Let's color to complete the picture. Easy to draw a cute Stitch drawing for beginners. This tutorial is perfect for beginners since the steps are super easy to follow. Concluding the Stitch sketch journey, thank you for joining me on this artistic voyage on how to draw Stitch full body. Every drawing carries a piece of the artist's heart, and I'm excited to see your rendition of this playful character.
Start with two large circles, the upper one overlapping the lower one. Draw the legs for Stitch according to the following steps. Add in details for Stitch's face, erasing guide lines as necessary. Detail Stitch's face, erasing guide lines as necessary. Here is a step-by-step drawing with easy instructions to make the job simpler. If you found this guide helpful, consider sharing it with fellow art enthusiasts.


